Hexo博客搭建及主题配置
Hexo博客
Hexo是一个快速、简洁且高效的博客框架。Hexo 使用Markdown(或其他渲染引擎)解析文章,在几秒内,即可利用靓丽的主题生成静态网页。
快速使用
1 | npm install hexo-cli -g |
Hexo的安装
安装Hexo相当简单,只需要先安装下列应用程序即可:
- Node.js (Node.js 版本需不低于 10.13,建议使用 Node.js 12.0 及以上版本)
- Git
所有必备的应用程序安装完成后,即可使用npm安装 Hexo。
1 | npm install -g hexo-cli |
Hexo的建站
安装 Hexo 完成后,执行下列命令,Hexo 将会在指定文件夹中新建所需要的文件。
1 | hexo init <folder> |
新建完成后,指定文件夹的目录如下:
1 | . |
目录及文件说明:
_config.yml:网站的配置信息,可在此配置大部分的参数。package.json:应用程序的信息。scaffolds:模版文件夹。新建文章时,Hexo会根据scaffold来建立文件。source:资源文件夹是存放用户资源的地方。除_posts文件夹之外,开头命名为_的文件或文件夹和隐藏的文件将会被忽略。themes:主题文件夹。
Hexo的常用配置
可在 _config.yml中修改大部分的配置。
网站
| 参数 | 描述 |
|---|---|
| title | 网站标题 |
| subtitle | 网站副标题 |
| description | 网站描述 |
| keywords | 网站的关键词。支持多个关键词 |
| author | 作者名字 |
| language | 网站使用的语言。对于简体中文用户来说,建议设置为zh-CN |
| timezone | 网站时区。一般的,对于中国大陆地区可以使用 Asia/Shanghai |
网址
| 参数 | 描述 |
|---|---|
| url | 网址 |
| permalink | 文章的永久链接格式 |
文章
| 参数 | 描述 |
|---|---|
| post_asset_folder | 启动资源文件夹 |
扩展
| 参数 | 描述 |
|---|---|
| theme | 当前主题名称。值为false时禁用主题 |
| deploy | 部署部分的设置 |
Hexo的常用命令
init
新建一个网站。如果没有设置 folder ,Hexo 默认在目前的文件夹建立网站。
1 | hexo init [folder] |
new
新建一篇文章。如果没有设置layout的话,默认使用 _config.yml中的default_layout参数代替。如果标题包含空格的话,需使用引号括起来。
1 | hexo new [layout] <title> |
generate
生成静态文件。
1 | hexo generate |
server
启动服务器。默认情况下,访问网址为:http://localhost:4000/。
1 | hexo server |
deploy
部署网站。
1 | hexo deploy |
clean
清除缓存文件 (db.json) 和已生成的静态文件 (public)。
1 | hexo clean |
组合命令
一行命令执行多条语句。
1 |
|
Hexo的常用插件
hexo-abbrlink
hexo-abbrlink,用于根据文档标题和数据生成永久唯一链接。
在_config.yml中修改相关设置:
1 | permalink: :year/:month/:day/:abbrlink.html #此处可以自己设置:abbrlink/,也可以直接使用 /:abbrlink.html |
hexo-image-link
hexo-image-link启用 hexo 后,将Markdown语法的图片路径转换为asset_img的方式,使图片能够在使用typora编辑和hexo预览发布时都能正常显示。
需在_config.yml配置文件中开启资源文件夹。
1 | post_asset_folder: true |
hexo-deployer-git
hexo-deployer-git适用于Hexo的git deployer插件。
需在_config.yml配置文件配置部署路径。
1 | deploy: |
Butterfly主题
主题安装
npm安装Butterfly主题
在Hexo根目录下,通过 npm 安装并不会在 themes 里生成主题文件夹,而是在 node_modules 里生成
1 | npm install hexo-theme-butterfly |
npm升级Butterfly主题
在Hexo根目录下,运行npm update hexo-theme-butterfly。
主题启用
修改Hexo根目录下的_config.yml,把主题改为butterfly
1 | theme: butterfly |
若未安装 pug 以及 stylus 的渲染器,还需下载安装:
1 | npm install hexo-renderer-pug hexo-renderer-stylus --save |
主题配置
在hexo的根目录创建一个文件_config.butterfly.yml,并把主题目录的_config.yml内容复制到_config.butterfly.yml去。(注意: 复制的是主题的_config.yml,而不是hexo的_config.yml)。
注意:
- 不要把主题目录的
_config.yml删掉 - 以后只需要在
_config.butterfly.yml进行配置即可
优化使用
私有博客自动构建推送至另一个仓库
目的
- 不想公开Hexo代码,或者有一些暂时不方便公开的内容,只想将静态页面(文字,图片,网站主题所用的各个样式和脚本)部署到 github page 。
- 用私有仓库写博客,通过GitHub Actions持续集成服务,自动构建推送到 GitHub 个人主页仓库 {用户名}.github.io
步骤
建立仓库
私有仓库,Hexo代码仓库
公开仓库,个人主页仓库 {用户名}.github.io
为仓库设置访问密钥
在本地电脑终端中输入以下命令
1 | ssh-keygen -f hexo-deploy-key -C "yourname.github.io" |
然后在C:\Users\Administrator\.ssh文件夹下获得文件hexo-deploy-key和hexo-deploy-key.pub。
上传密钥
上传私钥
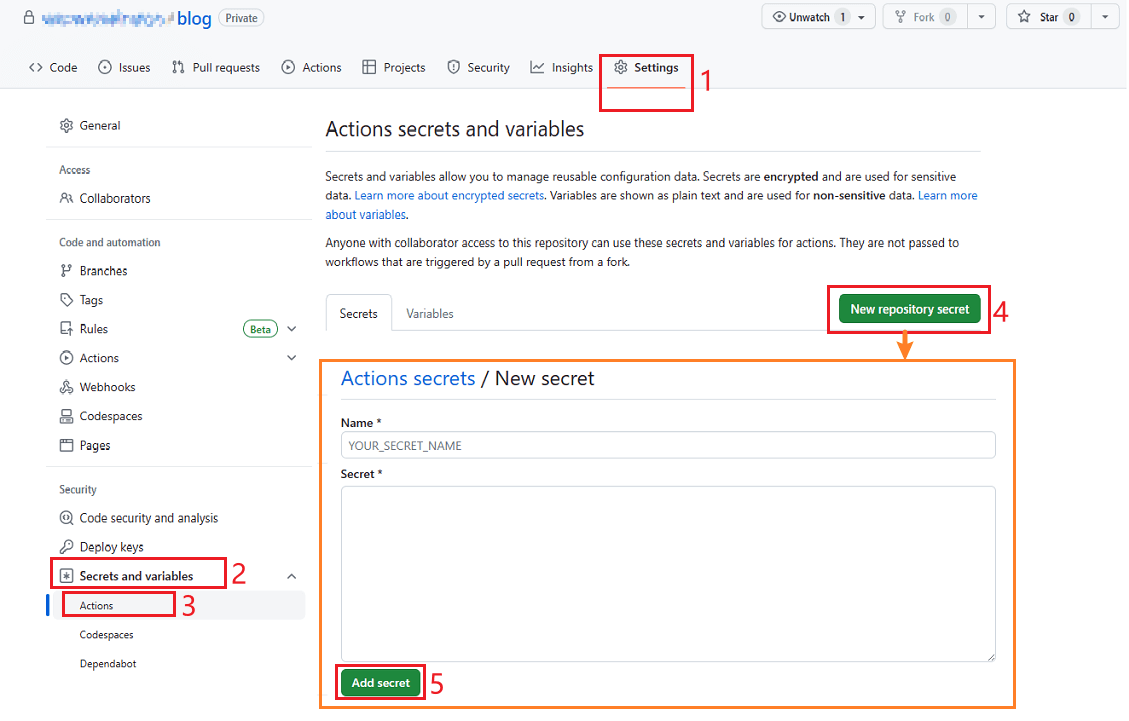
在github中的私有仓库进行如下操作:
Settings → Secrets and variables → Actions → 点击new repository secret新建仓库密钥

名字任意,但要与之后的workflow文件夹中文件内容对应,如使用HEXO_DEPLOY_PRI
Secrets内容为hexo-deploy-key文件内的所有内容
上传公钥
公钥被上传的仓库代表着要被部署的仓库,github 不支持同一个(部署)公钥上传至多个仓库
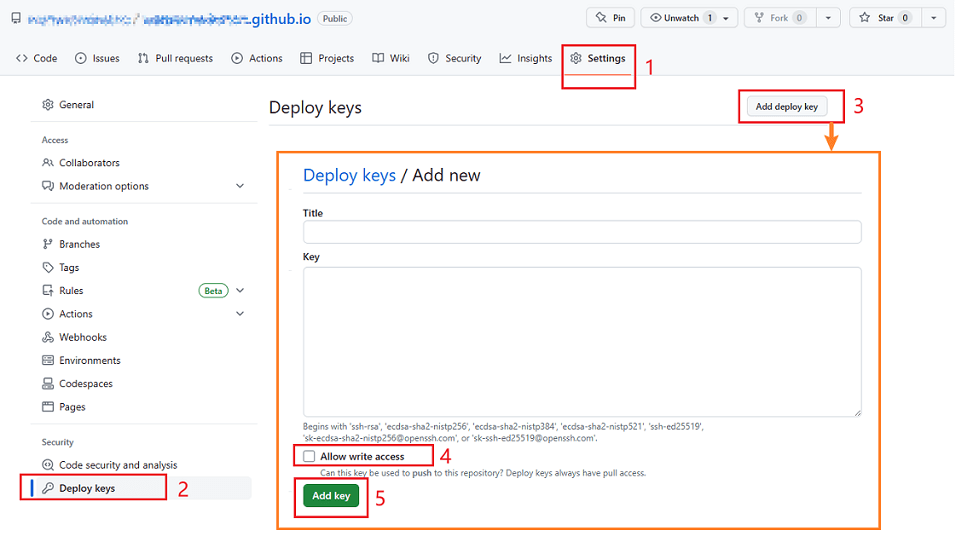
将公钥上传到要部署的公开仓库中
Settings → Deploy keys → 点击add deploy key添加部署公钥

标题名字任意,如HEXO_DEPLOY_PUB
key内容为github-deploy-key.pub文件内的所有内容
记得勾选Allow write access允许写入权限
然后Add key添加key,输入GitHub账户密码
配置 GitHub Actions
在代码仓库中的.github/workflow 添加hexo-ci.yml文件,然后将以下内容放进该文件中。
1 | name: HEXO CI |
限制对版本更新打开的拉取请求数
修改dependabot.yml,限制对版本更新打开的拉取请求数
1 | open-pull-requests-limit: 0 |


